How to Make MR Concept Video
Article posted on
2020-04-16
Intro
First, thank you all for your support and positive feedback about my latest MR/AR concepts. I’ve received many messages and questions on what tools I used. Therefore, I decided to make a tutorial. Then, I realized that it’s not magic. All the tricks I’m using are quite basic, and there are plenty of great tutorials where you can learn all of them. Therefore, I decided to describe my workflow step by step, from start to the end, explaining my approach and pointing to tutorials that dive deeper into specific features.
As an example, I decided to create an MR concept for a book store. I love real book stores. I can easily spend hours sitting in a corner behind a pile of books and just flipping through them. Once, my sister gave my wife and me a gift from Airbnb experiences called “Night in a book store”. Can you imagine how disappointed we were when they told us that it was not for a whole night but only till midnight?
Anyway, shopping in a book store has its disadvantages. All the books look really cool, and it’s difficult to get real reviews for all of them. Therefore, I’m quite often ending up with books that I’m reading only halfway through. When I’m shopping online, I can do proper research and order only the most recommended and suitable books. Therefore, I thought it would be cool if I could see reviews from Amazon easily in a book store. It would definitely help me select the right ones. Also, it might be beneficial for Amazon as, eventually, I would order a book from a cheaper source.
Also, I like setting up some theoretical restrictions and goals.
- This concept is for some future MR goggles that can track my gestures.
- I want to explore more gestures in one video. Sometimes, there might be better or more natural solutions, but I keep them for real work and try to explore as much as possible on the concept stage.
- It’s ok to make errors. For example, some UI fonts in the video below might be too small, but as this concept is for some imaginative headset from the future, we can assume that its resolution is good enough.
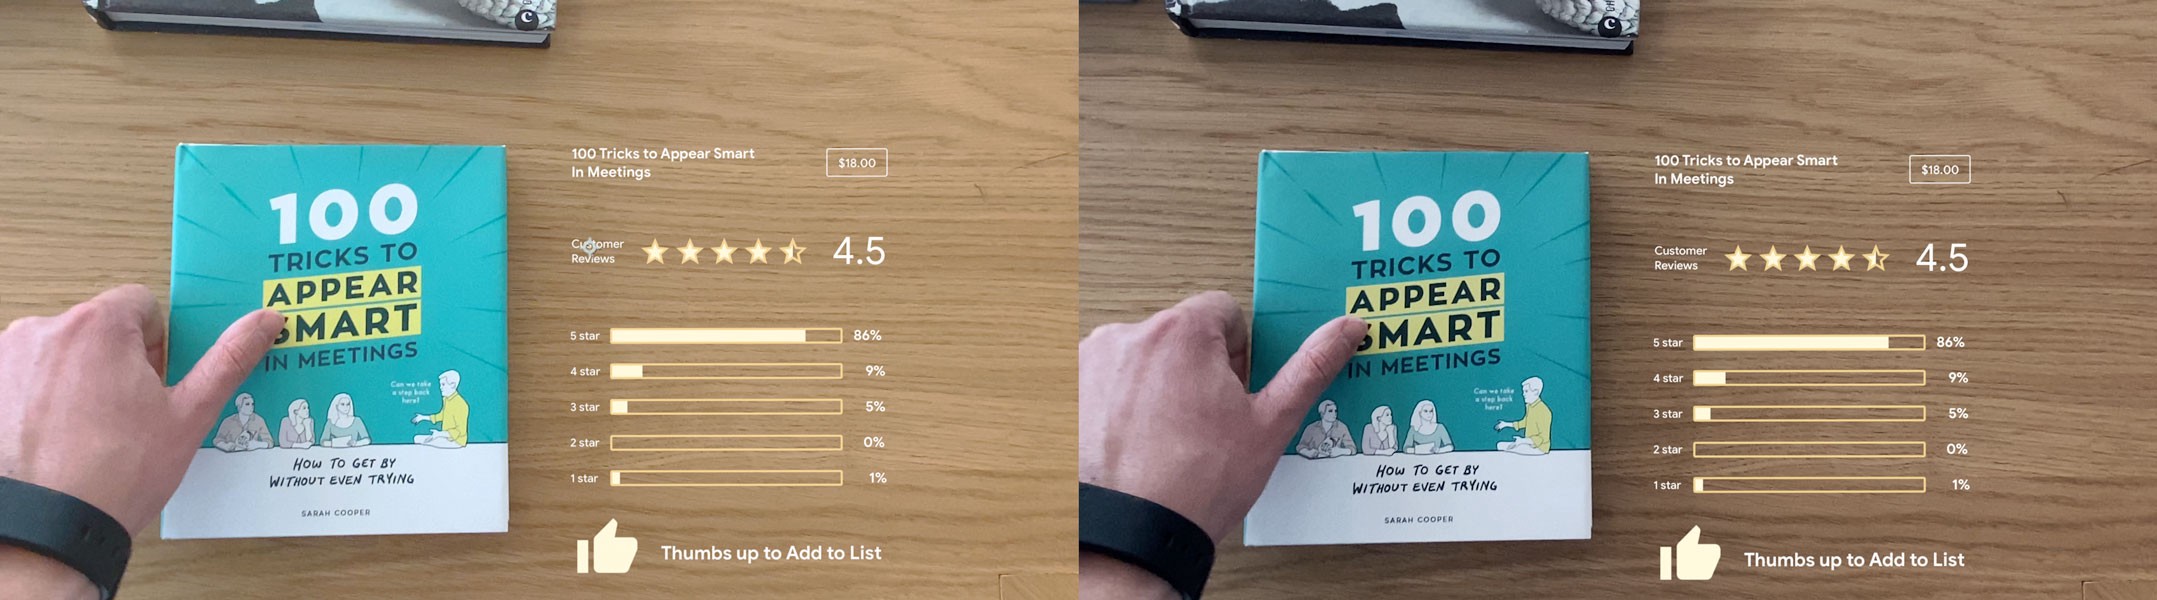
Here is my result:
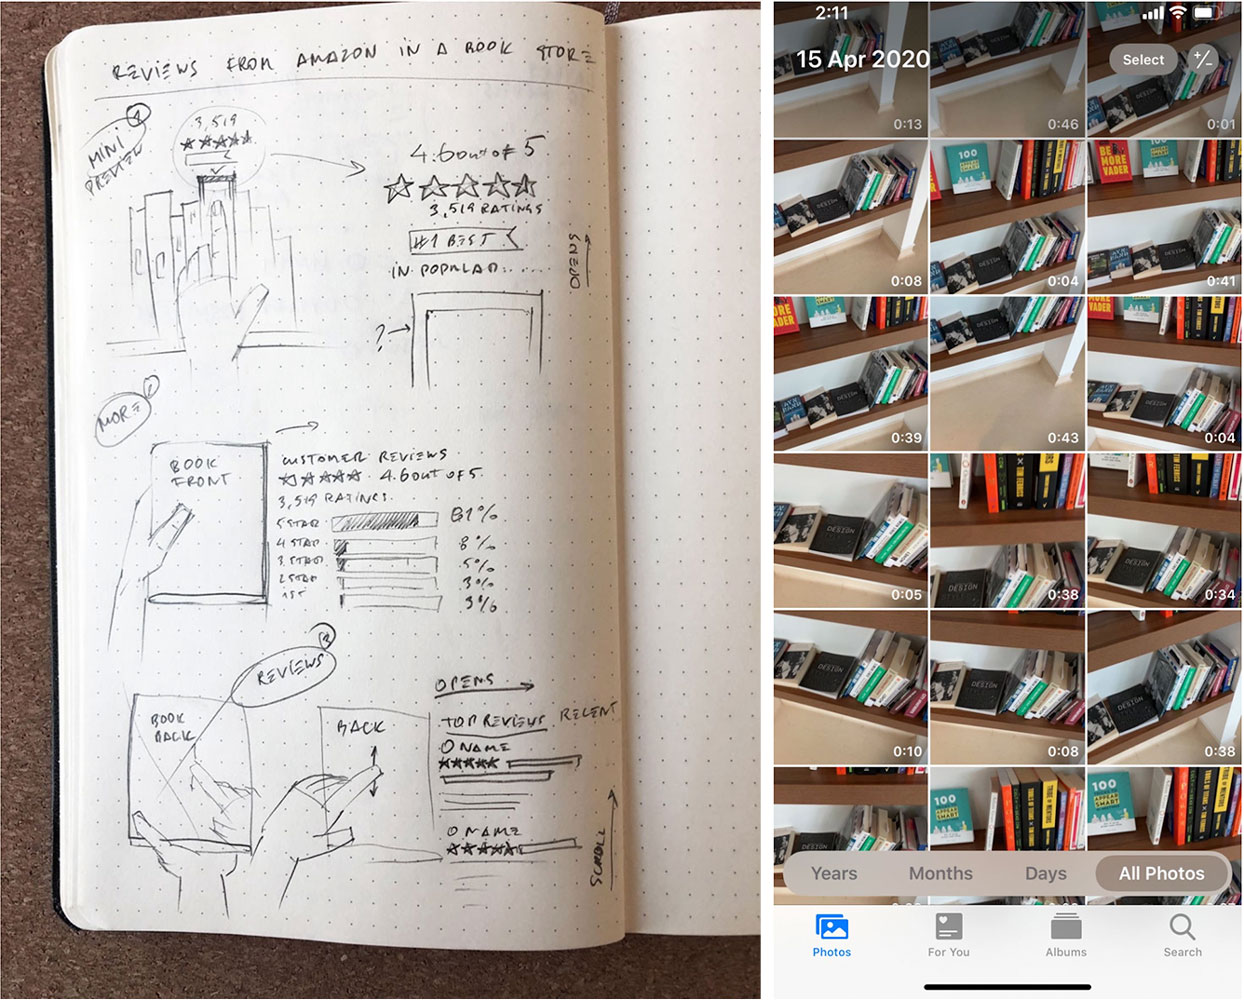
1. Sketch and Plan
For years, I’ve been using Trello to store and sort my ideas. It’s nice to get it out of the head and come back to find something new to try. When I’m selecting something that I want to explore, I’m making a lot of sketches and lists in my notebook, as it helps to iterate and explore options faster.
For MR in a book store, I sketched three types of UI that I wanted to prototype:
- The first one is a small preview of ratings next to the book that I’m pointing to with my index finger.
- The second one is a broader summary with a bar chart for each star rating, like Amazon has. It should appear when I hold a book or put my palm on it.
- The third one is a list of all reviews that I can scroll through. I decided to open it when the user is flipping a book. Quite often, reviews are indeed on the back of the book, and I noticed that this approach works quite well for a credit card.
In the next step, I needed to plan a whole scene. For this example, I didn’t want to focus on motion tricks, but on tracking and scene. Therefore, my story got quite complicated. I wanted to show each step a few times and from different perspectives, for example, the simple summary view when I point at a book from a side and a front side. Before moving to the next step, I wrote down all of the steps that I wanted to record in the right order and with maximum details.
2. Record Video
Then, I needed to record a video to use for background and tracking. For this video, I spent some time setting up an improvised book store in my dining room. When I was satisfied with the setup, I practiced all movements at first without a camera and then by looking through it. After practicing a few times, I started recording the video. As usual, I did a lot of tests, and then I reviewed them to select good angles and the right timing. The most crucial point here is to avoid making the moves too fast. I quite often do all actions way too fast, and then I don’t have enough time to nicely play all the animation and give the viewer a chance to get an idea of what’s going on. But I consider it a compromise that gives it some reality.
3. Make Screenshots
After you are happy with your footage, it’s time to go to a computer. The first thing I do is to save the screenshots of a few key frames. I’ll use them as background for making mock-ups. Better to select some parallel views.
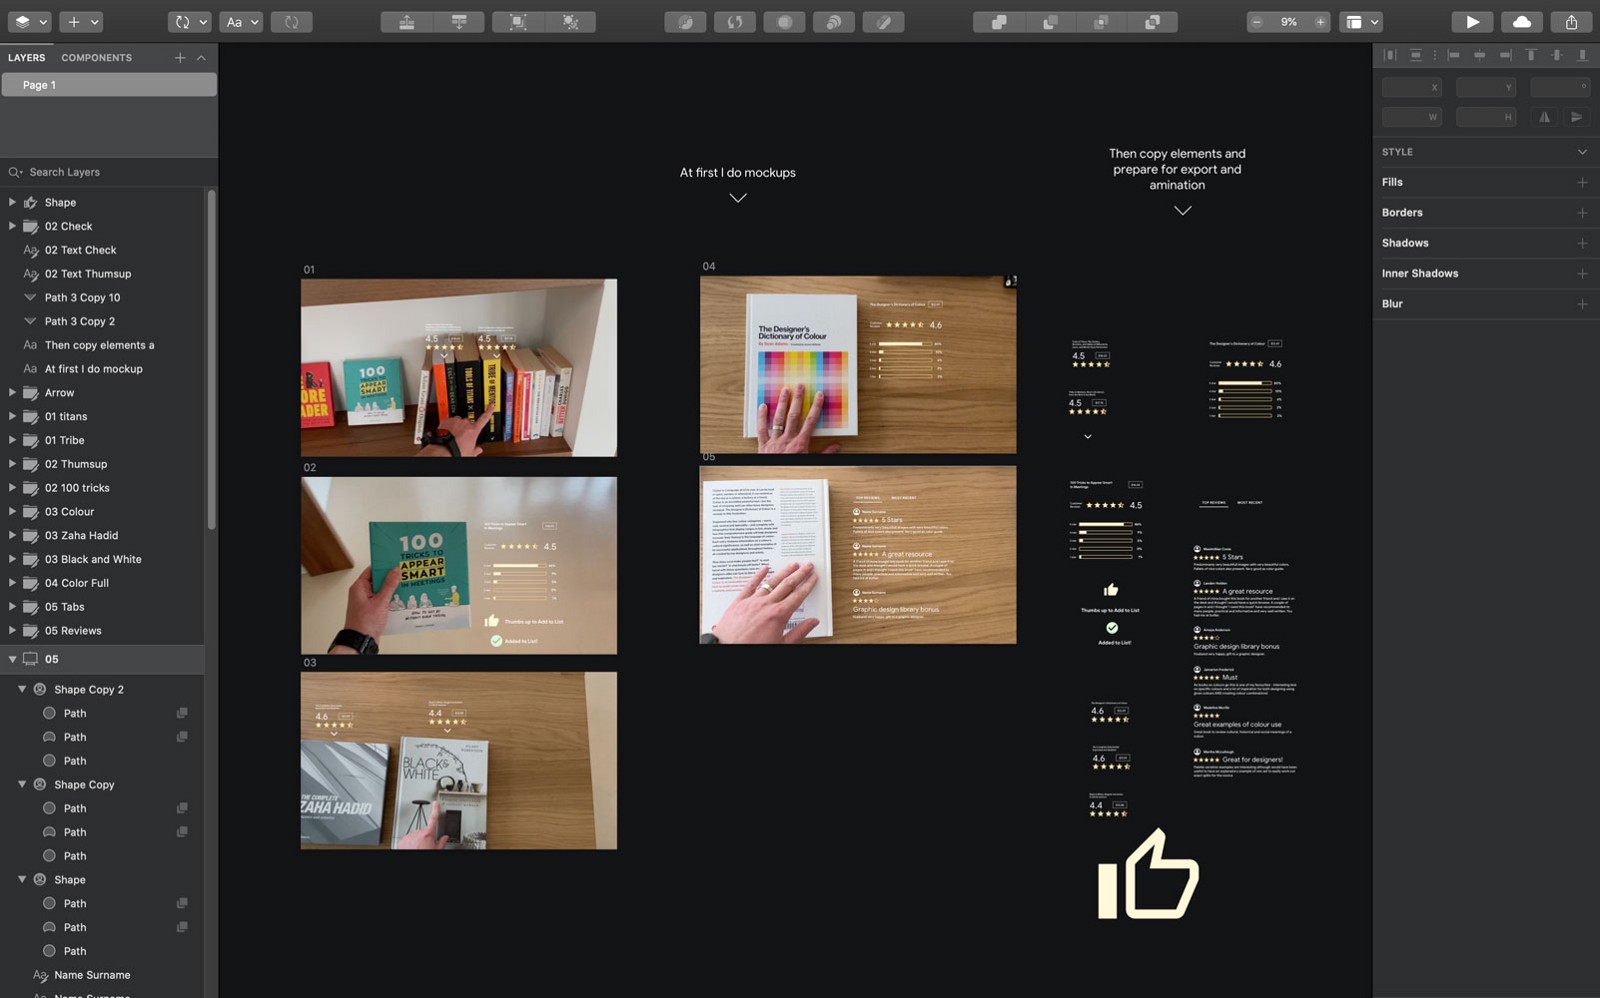
4. Create Mockups
For mockups, I’m using Sketch App. I find it more comfortable for working with multiple artboards and minimal UI. For something more complicated, I use Photoshop. With the same result, you can use Adobe UX, Figma, Illustrator, etc. At this stage, I care more about the UI itself, that it’s in an exact position or angle on the background. I attached my source files, Sketch file including, at the bottom of the page, so you can see how it’s organized.
5. Prepare Resources
After I’m happy with mockups, I prepare all materials for export. At this stage, I keep in mind how everything will move. Some objects are ok to group into one asset, and some make sense to save in larger sizes separately; quite often, I don’t save texts and add them in After Effects. When the UI is complicated, I save the whole screen and put it on the background of composition in AE to position all elements and then delete. For this particular demo, as I mentioned, I didn’t want to play too much with animations; therefore, interfaces don’t consist of many parts, and I didn’t have to use this trick.
6. Track Video
Now, we are finally ready to move to After Effects, gather everything together and see it come alive. I couldn’t explain it better than this video. If the flow is simple, it’s okay to track only once and connect all the animated UIs to it.
For my example, I had to do it eight times, as I had more items to attach to different books. One more good short tutorial that might be useful is one that helps you understand different tracking options.
7. Connect Compositions
When AE applies the tracking result to the target composition, it changes its position, rotation and scale. To make it easier, I create two compositions. I attach one of them to the tracked video and change the position of this comp after tracking using Anchor Point, as the rest is changing every frame. Inside, I place another comp that I rotate and scale if needed. And only inside of this comp I do all animations.
For example, in my After Effects file (attached below) in the “Main” composition, you can find comp “1Tribe” that has the position, scale and rotation applied by a tracked background. Here, I changed only the anchor point. Inside of “1Tribe” is “1Tribe Rotated” that is scaled and rotated. I made all motion only inside “1TribeRotated”. There is most likely a better way of doing it, but I’m just sharing the solution that I found for myself.
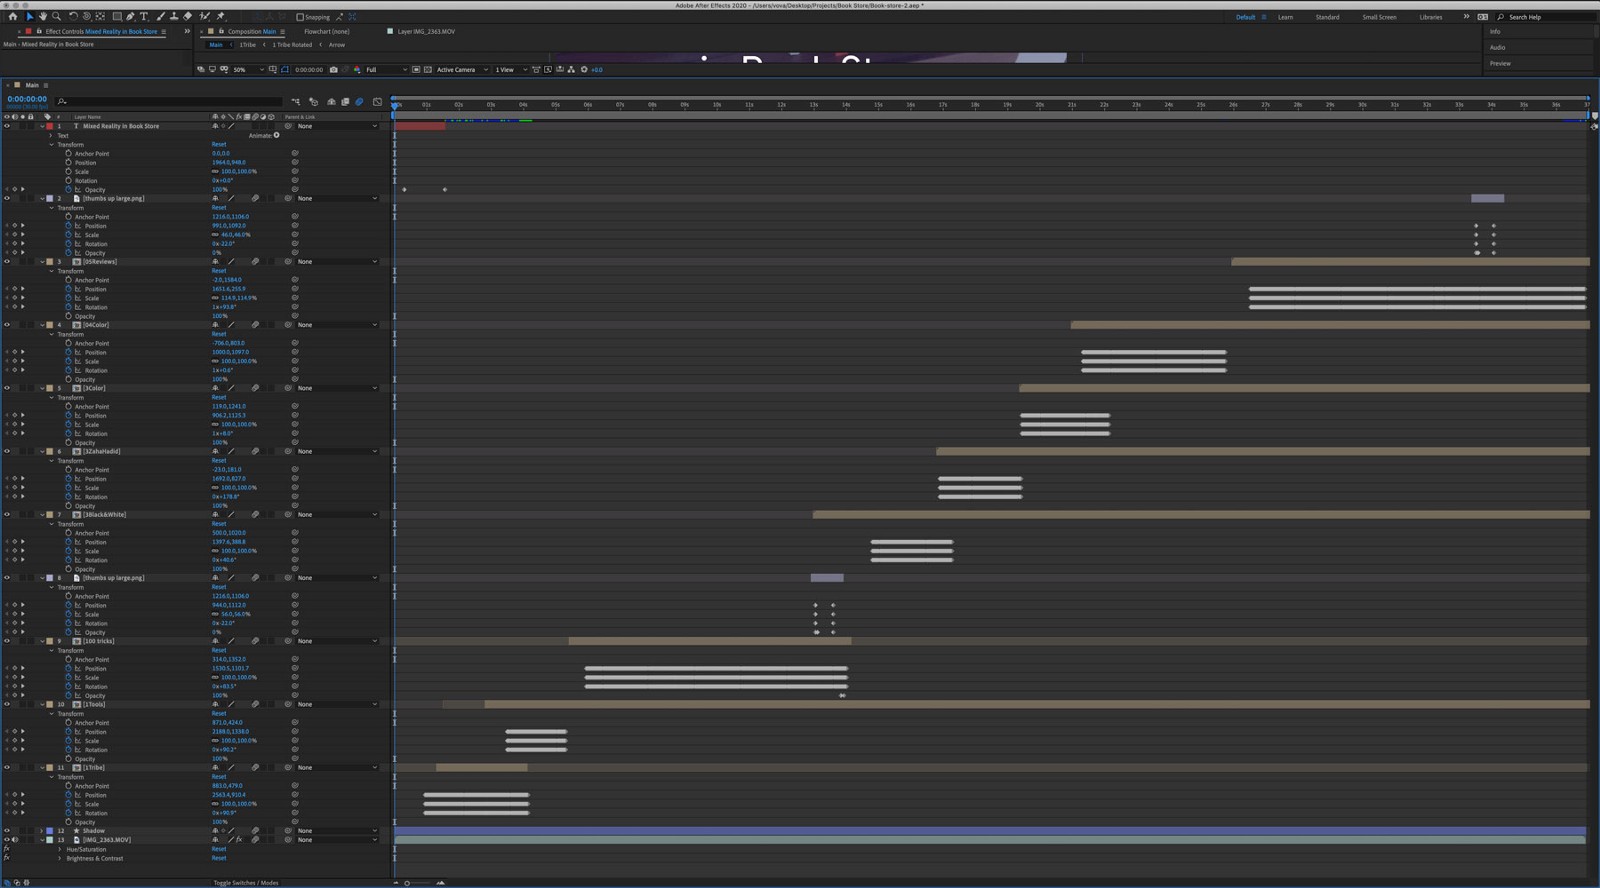
8. Make it Move
Now it’s time to go to child comps and make the UI move and look sexy. If you are familiar with the 12 principles of animation first introduced by Disney animators Ollie Johnston and Frank Thomas, you should be able to make UI movements fluid and nice.
A few tricks from me:
- Use motion blur.
- Use the graph editor to make a motion “easy in” or “easy out”.
- If you have gestures, pay attention to timing. The small disconnect can ruin the whole experience.
- If you have changing numbers over time, use this trick.
- When unveiling a new element, it is better not to make it just appear. Think about how it would behave if it were real. At least make new elements slide in from the side.
- To reveal some list elements or lines of text, I’m using such trick. (By the way, all videos that I mention here, I’m adding to a playlist on Youtube.)
9. Fix the Background
We are almost ready. All that’s left is to polish the video. To make the concept more realistic, I’m using white colours for the UI, and all colours for the MR headsets (at least those currently available) are additive, which means that you can not render black and dark colours. To make UI popping, I desaturate the background video slightly and make it darker.
10. Outro
Now, we are ready to render and see the final result. If your video is short, it’s a good idea to loop the end to the beginning, so it can play over and over again more fluidly.
Such a concept can be quite nice, but don’t forget that it’s only a small part of designing an MR, AR or VR app. As usual, this stage follows after the whole team goes through the brainstorming and clarification process. Such a video quite often works like a reference moving forward. By the way, you can find more resources about sketching and quick prototyping here.
Also, you might want to experiment more with a feeling of interaction, the easiest way to prototype it in Unity. You can find a lot of tutorials on their website. They are providing all users three months of complimentary access to Unity Learn Premium because of COVID-19.
11. Bonus Track
Here are the source files of the video from the beginning:
Again, Playlist on YouTube with short tutorials that I mentioned here.
It might be disappointing that I didn’t make a series of easy to follow, step to step tutorials, but I firmly believe that practising and testing is the best way to learn something. Here is a small motivation video for you to move forward.


